Python for SQL Developers: Getting Started

It has apparently been a REALLY long time since I wrote a blog post. I guess I've been busy! These days I work with a data analytics and integration team that primarily uses SQL. I wasn't super great at SQL when I started this position, but I've gotten better over the last few months.
One of the things that has helped is recognizing that most of what I want to write in SQL, I can write in Python with the help of pandas. So I thought it could be fun to write about it - what's common between Python and SQL and what's not, and especially when using pandas, how the transition distance is not that far!
Installing Python
First things first, if you're wanting to really understand what's going on, the best thing to do is to actually write Python. I like installing Python via the via Anaconda. (Don't forget to select the correct operating system for download - it defaults to macOS). In addition to installing Python it will give you access to Jupyter Notebooks (which I'll talk about later) as well as some IDEs and even RStudio if you want it.
Hint for Windows users: at some point during the installation you'll encounter a screen with an option to Add Anaconda to my PATH environment variable. The prompt on the screen suggests that it is not recommended. However, if you check the box, you won't have to fuss around with PATH issues afterwards. And I've never had it cause problems with uninstalling and reinstlling Anaconda. It's up to you! (If you decide not to check the box, you could check out this post for some tips on how to manage the PATH issues)
Using Jupyter Notebooks
Opening Your First Notebook
It's quite possible I'll write an entire post on this at some point, but Jupyter Notebooks can make your introduction to using Python even easier. You can open it a bunch of ways:
- Search for the Anaconda Navigator program. When it opens up the notebook option will be the second one you see. (You can also use the JupyterLab, which is the first option and has some great features but the notebook is fine for now)
- Search for the Jupyter Notebook program and open it up direclty. (I've actually saved this as a shortcut on my Start menu)
- Search for Anaconda Prompt. When it opens type
jupyter notebookand hit enter.

Once you've launched the application you'll be directed to the file directory screen. This defaults to the file directory that also houses your Anaconda installation. In my case it lives in my user folder. It should look something like this.

From here, you can hit the New button and select Python 3. (It's unlikely that you'll have another option to choose from, but more about that later) Doing this should open up an .ipynb file which stands for iPython Notebook (not something that is critical to remember)
Working in a Notebook
There's just a few quick pointers that are needed to get started using a notebook. The name of the file is next to the Jupyter logo in the top left-hand corner. You can click on the name to change it.
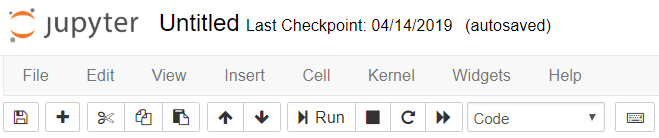
The notebook will auto-save every so often, but it's a good idea to hit the ol' save button if you're exiting the notebook just to be sure. Speaking of which, the save button icon looks pretty similar to what you'd see if you were in Word or Excel and so do the Cut, Copy and Paste buttons.
The trick here is what you are copying and pasting. A Jupyter notebook's key element is cells. You'll see the first cell available for use when you open up the notebook. You can use cells for typing your code and running it by hitting Ctrl-Enter (for "in place" work) or Shift-Enter to move to the next cell (or create a new cell if there isn't one) once your code has executed. (I'm actually not sure what the command buttons are on a mac...)
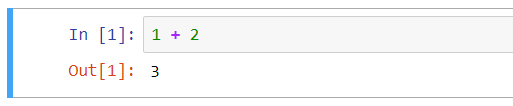
In the above case I just ran the simple operation of 1 + 2. Of course the expected output is 3 which is what is shown. (Note: while it was executing you may have noticed a * symbol for a brief second. This means the code was busy executing. When you start running more complicated processes, this is normal and you should just let the cell do its thing)
One other thing you might notice is the blue border around the cell. This means that the cell is in "command mode". You can enter this mode either by running the cell (as described above) or by clicking the space to the left of the cell. This is in contrast to "edit mode" where you will have a green border around the cell. When you are in edit mode you can type and change the contents of the cell. When you have the blue border you can change the "format" of the cell.
This is helpful because in a notebook we can change the type of cell we are working with. The default type is a code cell, but another helpful type is a markdown cell. A markdown cell lets you write text about what is happening with your code. This is great for talking about what you're doing and explaining things to yourself or someone who might read your work.
To manipulate your cells, make sure you are in "commend mode" and you can:
- Change the cell to markdown type: Find the dropdown menu that says Code by default and choose the Markdown option. OR use the keyboard shortcut
m. - Switch back to a code cell: Select Code from the drop down menu. OR use the keyboard shortcut
y. - Add new cells: Use the
+button in the tool bar. OR the keyboard shortcutato add a cell above, or abto add a cell below. - Move cells up and down: Use the up and down arrow keys in the toolbar.
Markdown Tips
One thing you might be wondering is, "What is markdown?" In simple terms, markdown is a simplified html verion. HTML stands for Hypertext Markup Language, so the simplified version is markdown. (For a more detailed explanation, you can check out the Wikipedia article.)
When entering text into your markdown cells you can just type regular text and leave it, but there's a lot of text formatting support that is also available. You can create headers with the # symbol and text after it. Try typing # My Title into a markdown cell, running it and seeing what happens. The more # you use in the beginning sequence, the smaller the heading text.
You can also use other basic formatting:
- bold: Use two
*on either side of the text you want to bold**like this**and then run the cell. - italics: Use an underscore to the left and right of the text
_like this_. - bullets: Use a dash, a space and then your text to create a bullet point. For more bullets in the list, press enter and repeat.
(Note: To edit a markdown cell after you have run it, just double click the cell.) For many more details on markdown syntax you can check out the Markdown Guide. You can also use LaTex to add mathematical symbols to markdown. If you want to use LaTex inline with your text you wrap it in a $ on either side. If you're looking to add a block of LaTex, you use three $ at the top and bottom of the text. For more tips on using LaTex for math symbols, you can check out this introductory tutorial.
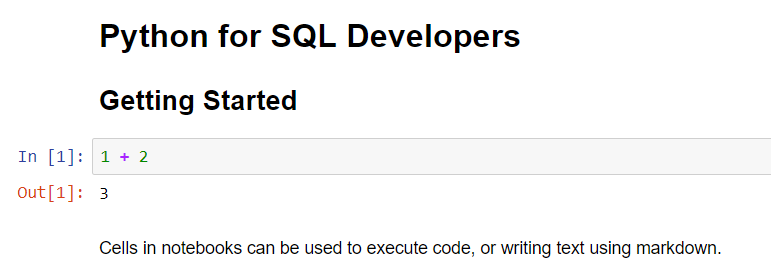
When you put it all together, you can make a document that seemlessly combines code and text that makes it possible to quick execute code and talk about it. Like this!
Til next time...
That's it for now. If you've been following along, why don't you play with creating some code and markdown cells and seeing what you can get to execute. I'll be back with my next article with some Python Basics!